Dutch Baby Recipe
A Dutch Baby can be a lovely nutrient-dense breakfast option.
Equipment
- Cast Iron Pan I use a 12 inch
- Bowl
- Measuring utensils
Ingredients
- 3 large eggs
- 1 cup milk
- 1 tsp vanilla extract
- 2 tbsp maple syrup, honey, or sugar (omit if doing savory)
- 1/2 cup all-purpose flour
- 1/2 tsp salt
- 4 tbsp unsalted butter
- 1 1/2 cups of berries (or your choice of fillings)
Instructions
Preparation
- Preheating the Oven: The key to a perfectly puffy Dutch Baby is a hot oven and a preheated skillet. Start by preheating your oven to 425°F (220°C). Place your cast iron in the oven while it pre-heats to warm up your cast iron.
- Mixing the Batter: While the oven preheats, whisk together the eggs, milk, vanilla extract, and sugar. I like to mix up the sugars I use. You can adjust for sweetness, or if you want a savory Dutch Baby, omit the sugar. Add in the flour and salt and whisk together again.
- Melting the Butter: Once the oven is preheated, carefully remove the hot cast iron and add the tablespoons of butter. Return the skillet to the oven and let the butter melt and sizzle for about 1 minute. You want to ensure that the melted butter coats the bottom of the cast iron. When you pull it back out, swirl it around to the coat the bottom and the sides of the cast iron.
- Add your toppings: Add your fillings to the bottom of the cast iron. When you pour in the batter, it will move the toppings around, and that is okay!
Baking the Dutch Baby
- Pouring the Batter: Quickly pour the prepared batter into the hot skillet with the melted butter and your toppings. The butter will start to bubble up around the edges of the batter, creating a crisp, buttery and fluffy crust. Again, it may move the toppings about, and each Dutch Baby will be different and vary based on your toppings or fillings your use.
- Baking Time and Temperature: Place the skillet back in the oven and bake the Dutch Baby for 20-25 minutes, or until it's puffed up and golden brown around the edges. Don’t open the oven door while it bakes, as this can cause the Dutch Baby to deflate.
Serving Suggestions
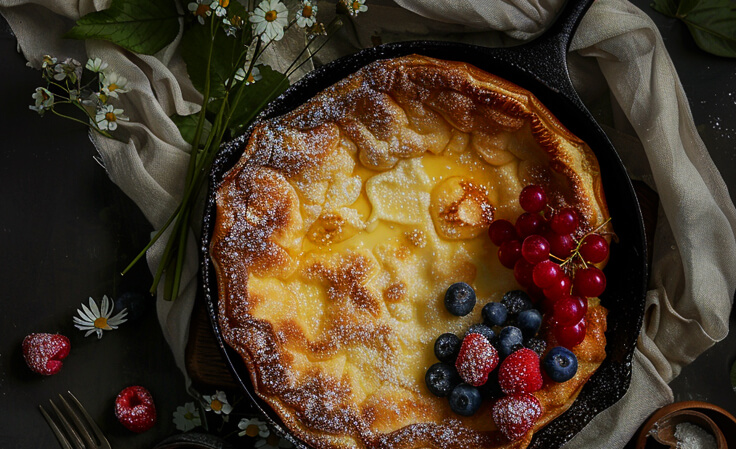
- Toppings: Once the Dutch Baby is fully baked, remove it from the oven and let it cool slightly before serving. Dust it with powdered sugar and add a squeeze of fresh lemon juice for a classic presentation, or get creative with your favorite toppings like fresh berries, sliced bananas, or a dollop of freshly-made whipped cream. Whatever suits your fancy! I even will add in lemon zest for a hint of lemon.
- Accompaniments: Serve your Dutch Baby alongside a breakfast meat and a glass of raw milk!
Variations
- Sweet vs. Savory: While the classic Dutch Baby is traditionally sweet, you can easily change it up just like you would with an omelet. You can add in cheese, herbs, bacon bits, and more! The Dutch baby batter is just the base of what a Dutch Baby can be!
- Flavorings and Additions: One time I paired my traditional berry Dutch Baby with some lemon zest and lemon juice that I had added to the batter, and it was fabulous! Not overwhelming, but just a hint of lemon in each bite. Even if you think you have failed at making a Dutch Baby, it will taste delicious as long as it isn’t overcooked.
Tips and Tricks
- Oven Tips: Make sure your oven is fully preheated before adding the batter to the skillet. The hot oven helps create the characteristic puffiness of the Dutch Baby, so don't skip this step.
- Batter Consistency: The batter should be thin, similar to that of crepe batter. If it's too thick, add a splash of milk to thin it out until it reaches the desired consistency.
- Serving and Presentation: To serve your Dutch Baby, cut it into wedges and serve it hot out of the oven for the best flavor and texture. Dust it with powdered sugar and add your favorite toppings for a beautiful presentation that's sure to impress your family and friends.