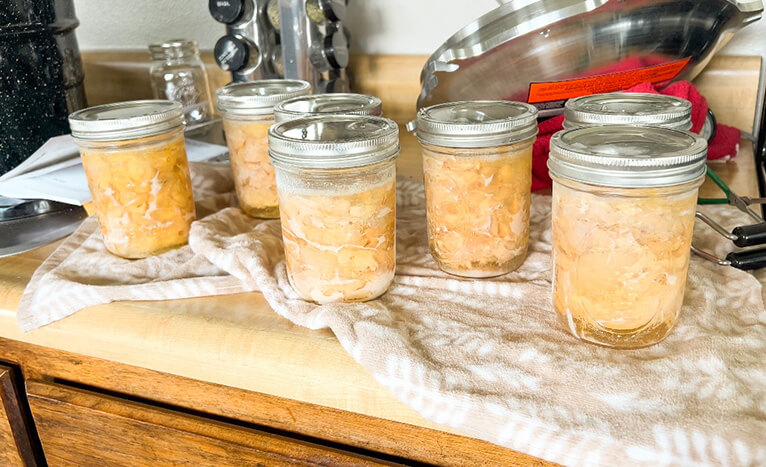
Have you ever had canned meat? Maybe tuna or chicken? Let me teach you how to make homemade canned chicken! It’s easy, and it leaves you with a ready to eat meat that you can eat from the jar or throw into a recipe!
I love having easy meals that I can make after a long day of farm work. Canning meat has multiple benefits: easy to throw into recipes, stores for a long time, and it tastes good! It doesn’t look very appealing, but I’m sure the store canned meat doesn’t either, but they just don’t let you see it by canning in tin, haha. The best part about canning your own meat is that you know exactly what ingredients went into it.
How do you can meat?
You have to pressure can meat. There are two types of canning: water bath and pressure. Because meat is low acid, you will have to use a pressure canner to properly and safely can it. All you need is a pressure canner, meat, and some jars!
Is canned meat safe to eat?
Yes, if it has been canned properly and the packaging has no dents or other signs of spoil, then it should be safe to eat! Always use your eyes and nose to detect any issues with canned goods. I use my eyes and nose to detect issues with food in general—same goes with canned goods!
How do you can chicken?
You can cut raw chicken into cubes, pack it into jars leaving a 1 1/4 inch headspace, add in 1/2 teaspoon of salt per pint, and place them in the canner. Process the chicken according to your altitude as canning pressure varies due to your altitude. This method of canning chicken is called the “raw pack method” because the chicken is raw when you place it into the canner. You don’t need to add any liquid into the jars because liquid will come out of the meat. You can also do a “hot pack method” of canning chicken where you slightly cook the chicken before placing into the jar. This process allows you to place more chicken into the jar, but I feel that the raw pack method is easier because you don’t have to deal with cooking the chicken.
The hot pack method is preferred because you fill the jars with liquid to cover the meat, whereas the raw pack method generally won’t leave you with enough liquid to cover the meat for storage. I still like the raw pack method.
What equipment do you need to can chicken?
Pressure canner – I use my All-American 921
Pint or quart jars – I find that pint jars are the perfect amount for most recipes.
Lids and bands – You need to use new lids every time you can, but you can reuse bands as long as they are in good shape.
Canning supplies - I would suggest getting a set of canning supplies that has a headspace measurer, funnel, jar grabber, and lid grabber. I use these and they come in handy!
What pressure do you can at?
Dial-gauge pressure canner:
0-2000 ft: 11 lb
2001-4000 ft: 12 lb
4001-6000 ft lb
6001-8000 ft 14 lb
Weighted-gauge pressure canner:
0-1000 ft: 10lb
Above 1000 ft: 15 lb
Pressure canning can seem daunting, but I promise that if I can do it so can you!
Let’s get canning!

Raw Pack Chicken Canning
Ingredients
- Raw Chicken
- Salt
Instructions
- Before you start chopping up your chicken (you don’t need a specific amount,) lay out your jars and lids so they are ready to be assembled to make the process easier. Follow the instructions in your canning manual to get your canner ready. For the All-American 921, fill it with 2-3 inches with water.
- Add 1/2 teaspoon to each jar. Chop up your chicken into cubes and use a funnel to pack them into your jars leaving 1 1/4 inch headspace.
- Place into your canner and process for 75 minutes for pints and 90 minutes for quarts. If you are doing a mix of pint and quart, process at 90 minutes.
- Follow the instructions for your canner to release pressure. Place your jars on a flat surface and leave undisturbed for 12-24 hours.
