As the old construction mantra goes: “All concrete will eventually crack.” It’s the normal progress of nature, for things to break down, crumble, and eventually turn to dust. Concrete is no different. Even if you live in a mild climate, slight temperature changes lead to expansion and contraction, and this movement eventually causes cracks to form. Once that happens, the water gets in and then organic matter enters, and the cracks grow bigger.
In cold climates, the rate of deterioration is typically much faster because of the temperature swings and the action of water and ice. When ice forms in a crack, the crack expands. In any case, don’t be alarmed. If you follow the procedure herein, you can extend the life of your driveway, or concrete slab, by 10 or 20 years, even in the harshest climates.
How do you accomplish this?
By stopping or slowing this natural deterioration process. In particular, you can seal cracks to stop the damage caused by water. The concrete surface you want to seal will typically already have cracks, or it will have what are called control joints. These are man-made lines that are put in the surface of the concrete to control WHERE the concrete will crack. These control joints are manually formed or cut in with a saw at the time of concrete installation. Even a brand new driveway will have these Control Joints. If so, you will just need to seal those joints so when the cracks form along the joints (they will), they will already be sealed and protected from water and further damage.
Preparation – Cutting Out the Cracks
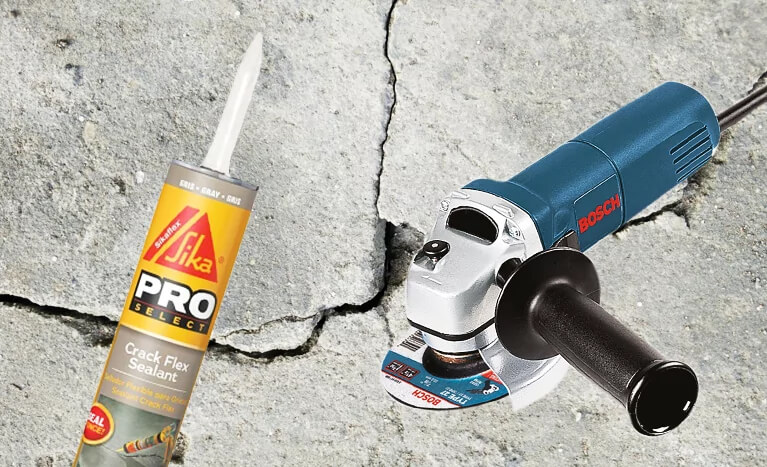
Your concrete surface may not have control joints, and you will see cracks just finding their own path across your slab. In this scenario, you will need to cut or grind out some of those cracks to open them up for the sealant. You can do this with a 4.5 inch angle grinder.
You will need a diamond-coated blade to cut the concrete. Any diamond blade will do, but here is one specifically designed for concrete cracks, called a Benchmark Abrasives Crack Chaser Diamond Blade.
To dig out the cracks, you can also use a 7 1/4 inch circular.
With your circular saw, use any diamond coated saw blade, or a masonry blade.
These blades are not expensive. They are sometimes flexible and bend slightly as you move them along the cracks. You will need about 1 blade for every 10-15 feet of crack, plus or minus depending on the crack. At the time of writing, these blades run about $15 for a pack of 5.
You will run these tools down the crack to widen it to about 3/8 to 1/4 inch wide at the surface. Wear a mask and goggles for proper protection.
If your concrete surface has huge cracks ALREADY, don’t despair. You can buy backer rod to put in the cracks and save on the amount of sealant product required to fill it. This backer rod sits under the sealant you will apply. You push the backer rod down into the crack far enough that your sealant will sit on top of it and come level with the concrete. A knife or screwdriver works well to push in the backer rod.
Here is the typical backer rod for this job.
This is also inexpensive.
Preparation – Taping the Cracks
After you cut out the cracks and are ready to seal them with caulk, you might want to use painter’s tape to make your job look more professional. If so, buy tape like this.
Tape will make a nice edge on both sides of your sealant.
You don’t have to use this tape, but your job will look more professional if you take the extra time to tape everything. Put your tape down on BOTH SIDES of the crack about 1/8 to 1/4 inch from the crack, and remove it after the sealant is applied.
Applying the Sealant.
For sealant, I recommend, Sikaflex concrete sealer.
If your concrete is level, you can use self-leveling Sikaflex.
You will need a 10 ounce caulk gun, and it’s best to spend a little more money for a quality gun.
On a level surface, put down enough self-leveling sealant to fill the crack and just overlap the blue tape. The sealant will drop into the crack and in some areas will leave an open hole. You will need to let it dry some and then go around and fill all the holes with a second coat after the sealant sinks in.
On an unleveled surface, put down enough caulk to fill the crack. Then run a flat object over the top to make the surface uniform. Many people use their finger, but it’s not a good idea to let the caulk touch your skin. Instead, use a flat piece of scrap metal or buy a caulking finishing tool like this.
Before you start caulking, get a roll of paper towels. Purchase a box of disposable vinyl gloves like this to protect your skin.
These will protect your fingers from the caulk and are handy gloves for many jobs around the house. None of the above products are expensive, certainly not in comparison to paying a concrete company to replace your slab, which can be very costly.
If you follow the above process to extend the life of your concrete driveway or slab, please take pictures and send them to me on social media. You can also watch a video of me doing this to my own drive way here: