Last Saturday I found myself out in the glorious sunshine with my trusty caulk-gun, singing my favorite fall mantra:
Old MacDonald had a farm...
With a crack-crack here and a crack-crack there
Here a crack
There a crack
Everywhere crack-crack...
Or something like that. What was I singing about? Basically, I was celebrating my annual maintenance, where I go around the exterior of my house sealing cracks. I look for new openings around doors, windows, siding, basically any nooks and crannies with cracks that have formed in the past year.
When I moved into this house, it was evident that the previous tenant never did anything at all to fill cracks in these places. It's fair to say that the structure was never weatherproofed after the original homebuilder or painter applied caulk to seal cracks.
Is this lack of maintenance unusual?
Not at all; in fact, it's typical. Almost every homeowner pays little or no attention to the exterior cracks and crevices that form over time, allowing moisture to enter the structure and damage the interior.
How do cracks form around the exterior of my house?
These cracks form naturally as the wood of the home changes, expanding and shrinking with weather variations. Many wood building materials have moisture inside when sold, and as this moisture evaporates, the wood shrinks. This can open cracks around the home exterior, especially if the original sealing job was done with cheap or inferior products that outlive their lifetime...
Go ahead, walk around almost any home, and you will find yourself singing my fall-time ballad:
With a crack-crack here and a crack-crack there
Here a crack
There a crack
Everywhere crack-crack...
In my home, the first year I used over 2 tubes of caulk to fill the cracks. The second year it was less than one... the third, almost none.
Why did the amount of caulk diminish?
Primarily because once everything is sealed correctly, not much water gets in so the amount of movement diminishes, and you don't need to seal as much the following year. This maintenance task becomes very simple after the cracks are under control. Neglect the annual caulking too long, however, and the situation can get so bad that the wood structure is damaged and needs to be replaced: the cracks get so big, caulk won't fill them. Mold and insects start to invade. The cracks are out of control and start living a life of their own: water enters and it can even lead to extensive mold growth, insect penetration, or significant structural damage to the house. You may be asking yourself these questions:
How do I seal cracks around my house?
How do I weatherproof my house?
How do I caulk gaps and cracks outside?
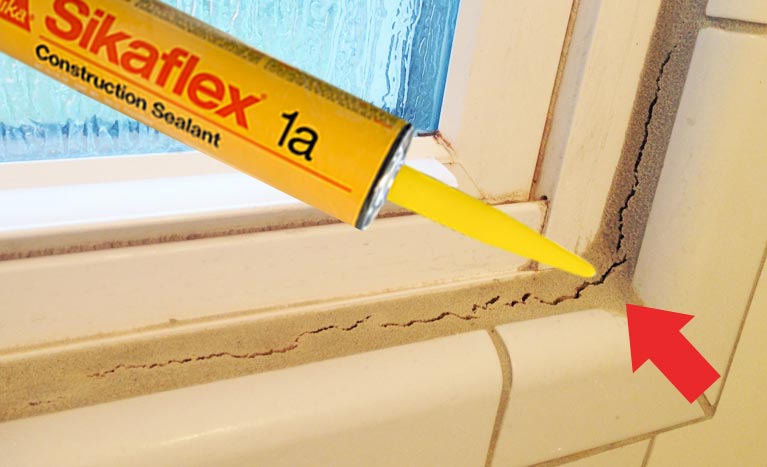
In this post, I will give you pointers on caulking your exterior. Before you start the job, wait a week or two after it rains so all the moisture in the existing cracks will have evaporated. That way, water will not get trapped under the caulk you apply. Here are some tips to get you started.
- Get a quality caulk gun, one that limits the mess caused by improper control of caulk pressure. With some guns, pressure builds and when the lever is released, caulk squirts out. Avoid this by getting a "dripless" gun. The caulk gun I use is economical but highly effective:
- Use quality caulk. Do not buy the cheapest caulk, although the one I use is not at all expensive yet very effective. I have used this product for several years. It stretches well to accommodate movement, so cracks won't easily reopen. It comes in different colors, but instead of trying to match your house color, just get this one and paint over the caulk with your exterior house color an hour after you are done sealing: DAP DYNAFLEX Ultra.
- Prepare the tip of the caulk dispenser. First of all use a box cutter knife to cut off the tip of the caulk dispenser at an angle. Don't cut too much and leave a small hole so only thin beads are released into the cracks. Then file or sand the tip on both sides to form a sort of triangle so the plastic tip will ride inside the crack as the product comes out. This will apply very clean beads of caulk. Then use a sharpie to draw a line on the back of the tip to show how the dispenser will ride. These three things will help greatly. Put the sharpie line at the top so you know how to position the dispenser each time you start on a new crack.

- Keep the job clean. Bring a roll of paper towels. You will likely need many paper towels the first year and fewer in the following years, as with the amount of caulk. While applying a bead of caulk into a crack, your hand will waver and some caulk will miss the mark. That's OK. Just wet your finger in a glass of soapy water and pull it along the crack, forcing caulk into the opening and leaving a nice finished bead. If you are not used to doing this, it will be messy at first. Just wipe your finger and move on to the next crack.
I hope this helps you learn how to better care for your home and extend its life! Happy caulking!
Check out my vlog of me sealing the cracks in my driveway