So your new Harvest Right Freeze Dryer arrived and you're wondering how the heck to set it up?! Well, let me help you! I was a little overwhelmed when mine arrived because it seemed so complicated, but rest assured, it's not!
How do I set up a Harvest Right Freeze Dryer?
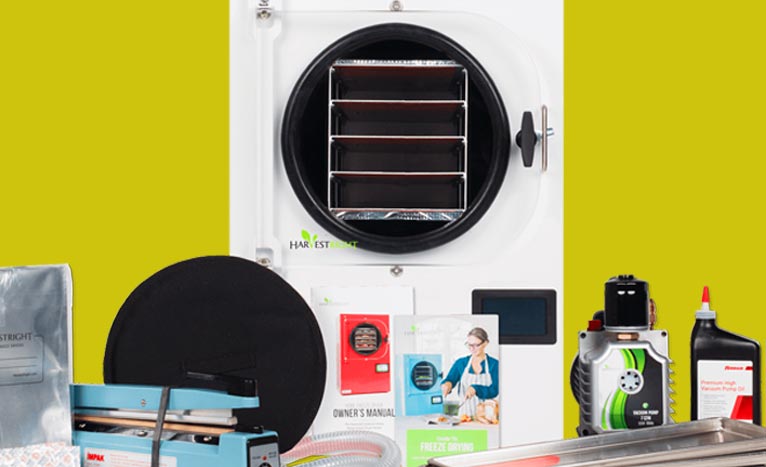
First unbox the unit and make sure all the accessories, as listed, are included. Set the individual components on a flat surface. I created an unboxing video, found here, to show you everything included with a new freeze dryer. I also recorded my first operational run; watch it here to see how it went!

To get it set up, you need the pump (oil or oil-less), power cables, and a drain hose. The drain hose initially connects to a drain on the inside of the freeze dryer, and you will pull it out of the opening on the left side. It's initially stored inside so it fits in the box for shipping. I worked a little bit to finagle mine out, but it wasn’t too difficult. Connect the hose to the spout and turn it in line with the hose, so any residue drains out of the freeze dryer. Place a bucket at the end of the hose for the water. Harvest Right performs test runs with your unit before shipping, so don’t worry if some of their water drips from the drain system.

Next connect the power cable to a wall outlet. The cable is located on the back of the freeze dryer. NOTE: the large sized freeze dryer requires a 110v outlet with a dedicated 20 amp circuit! Medium and small Harvest Right Freeze Dryers do not require a dedicated circuit! Connect the power cable from the pump to the back the freeze dryer. Note that the pump doesn’t plug directly into the wall.
Pump setup will depend on the pump you have. Premier pumps currently come standard with freeze dryers, so I'll write about the premier pump setup because I'm experienced with it.

How do I set up the premier pump for my Harvest Right Freeze Dryer?
Place your pump on a flat, even surface to the right of the freeze dryer. The right side works better for cable management and space saving, but you can use either side. The pump gets hot during the freeze drying process, so don’t place it on a surface that might melt. I have mine resting on top of a Husky wooden-top toolbox that handles heat well. I wouldn’t rest the pump on a plastic surface; some people have even reported that metal carts can warp from the heat.

After situating the pump, screw off the top demister and add oil up to the middle mark in the window. When the machine runs, the oil level falls below the middle line as it’s sucked into the pump—don’t panic! The oil level returns to the middle line when the freeze drying process completes.

SPECIAL NOTE: you want this knob to ALWAYS be turned to “O” meaning OPEN. If you operate the pump with it closed, it could ruin the pump.

Next, connect the vacuum hose from the pump to the freeze dryer. Hand-tighten each connection. Don’t over-tighten. I had no problem getting a secure seal just using my hands. I ran multiple batches without any vacuum leaks!
Once everything is connected, flip the switches on the back of the pump and freeze dryer to ON, which is “—” on the buttons. “O” is for OFF and “—” is for ON. Once on, the freeze dryer screen will come alive!
Click the circle leaf logo in the top left to run functional tests before starting your first batch. Starting with the freeze, you will want to toggle “on” by pressing the “on/off” button below the word “Freeze.” The refrigeration condenser will kick on. Close the door and ensure the drain valve is closed by having the knob perpendicular to the hose. The drain valve is open when the knob runs in line with the hose.
Run the condenser for 30 minutes; then turn on the vacuum by pressing “on/off” below the word “Vacuum.” The vacuum pump will turn on, and within 20 to 30 minutes, the Pressure reading should decrease below 500mTorr. When the Pressure dips below 500mTorr, testing is successful. Press DONE and EXIT. You are ready for your first batch!
Where is my freeze dryer not vacuum sealing?
If your unit’s pressure didn’t reach below 500mTorr, you may have a vacuum leak. This can occur if the drain valve is open. Ensure it is CLOSED by having the knob perpendicular to the hose. Another area for potential leaks is the hose connection between the pump and freeze dryer. Verify that the hose is hand tight. If it's too tight, it could lead to a loose seal.
Why did water come into the freeze dryer chamber?
If your drain hose was immersed in water when you opened the drain valve, it will suck up some water that will rush into the freeze dryer chamber, ruining whatever you just spent hours freeze drying. Always ensure the drain hose is NOT in water when you open the valve to release pressure.
How do I test my freeze dryer?
For the first ever run, use bread. I'd suggest a cheap loaf. Bread will suck up any "new car" smell and it will test the freeze dryer. I made the mistake of moistening my bread, and the freeze-dry process took way too long. You can do this, but using bread right from the package works just fine too.
I hope you enjoy your Harvest Right Freeze Dryer as much as I enjoy mine!