When starting a garden, don’t be scared to get your soil tested. I realized last year after I dealt with a few failing blueberry bushes (who prefer alkaline soil) that I should probably get the soil tested from different areas around the garden and homestead.

How to Test Soil pH: A Complete Guide
Testing soil pH is an essential aspect of gardening and farming. Soil pH is a measure of acidity or alkalinity in the soil, which affects the availability of nutrients to plants. Most plants prefer a slightly acidic soil, with a pH between 6.0 and 7.0. However, some plants thrive in more alkaline soil, while others prefer more acidic soil. Understanding your soil pH can help you choose the right plants and fertilizers for your garden or farm.
In this article, we will discuss the different methods of testing soil pH, the importance of soil pH for plant growth, and how to adjust soil pH.

Why Test Soil pH?
Soil pH is crucial for plant growth because it affects nutrient availability in the soil. Nutrients such as nitrogen, phosphorus, and potassium are only available to plants within a specific pH range. For example, if the soil pH is too acidic, essential nutrients like calcium, magnesium, and phosphorus may not be available to the plants. On the other hand, if the soil pH is too alkaline, essential nutrients like iron, zinc, and copper may not be available to the plants.
Testing soil pH is also important for soil health. Different microorganisms thrive in different pH ranges, and soil pH affects the decomposition of organic matter. Understanding your soil pH can help you create a healthy environment for beneficial microorganisms to thrive and support plant growth.

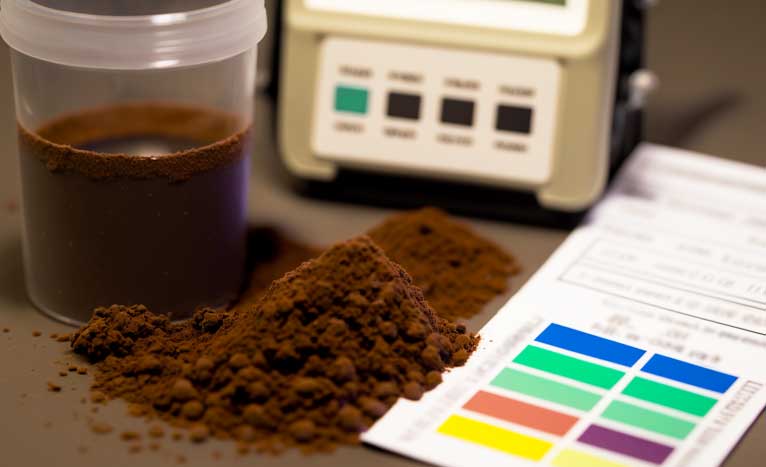
Methods of Testing Soil pH
There are several methods of testing soil pH, including:
Using a Soil pH Meter
A soil pH meter is a digital tool that measures the acidity or alkalinity of soil. To use a soil pH meter, insert the probe into the soil to the depth specified by the manufacturer's instructions. The meter will display the pH value on a screen. Soil pH meters are affordable and easy to use, making them a popular choice for home gardeners.
Using pH Test Strips
pH test strips are small paper strips that change color based on the pH of the soil. To use pH test strips, mix a small amount of soil with distilled water to create a slurry. Dip the pH test strip into the slurry and compare the color to the chart provided with the strips. pH test strips are inexpensive and straightforward to use, but they may not be as accurate as other methods.
Using a Soil pH Testing Kit
A soil pH testing kit is a chemical-based method of testing soil pH. To use a soil pH testing kit, mix a small amount of soil with the test solution provided in the kit. The solution will change color based on the pH of the soil. Compare the color of the solution to the chart provided with the kit to determine the soil pH. Soil pH testing kits are more expensive than other methods but may provide more accurate results.
Sending Soil Samples to a Lab
Sending soil samples to a lab is the most accurate method of testing soil pH. Soil testing labs use specialized equipment to measure soil pH and nutrient levels accurately. To send a soil sample to a lab, collect a small amount of soil from several locations in your garden or farm. Mix the soil together and send a sample to a soil testing lab. Soil testing labs may charge a fee for their services.

Adjusting Soil pH
Once you know your soil pH, you can adjust it to meet the needs of your plants. If your soil pH is too acidic, you can add lime to the soil to increase the pH. If your soil pH is too alkaline, you can add sulfur to the soil to lower the pH. The amount of lime or sulfur needed depends on the current pH of the soil, the type of soil, and the plants you are growing. It's essential to follow the instructions carefully when adding lime or sulfur to the soil.
Here are the supplies you'll need:
First up, a soil test kit. You can get one from a lab or your local county extension office. And guess what? In some states, they'll test your soil for free! But if you want to save some bucks, you can make your own DIY kit using distilled water and some baking soda or vinegar.
Next, you'll need a shovel or a hand trowel to dig up a small amount of soil. Pop it in a bucket or a large glass jar until you've got all your samples.
Remember to gather soil from different areas to get a more accurate result. And don't forget a plastic bag (a Ziploc bag is perfect) to keep your samples separate.
Last but not least, use a marking pen to record the location of each sample so you can keep track of where they came from.
Pro tip: while DIY soil tests are convenient, they might not be 100% accurate. For the best results, it's a good idea to use an extension office or independent lab. Happy gardening!
How to Test Soil: Step-By-Step
- First things first, gather all your necessary supplies. You'll need a soil test kit, a bucket, a shovel or trowel, a Ziploc bag, and a marking pen.
- Before you start digging, make sure to brush away any debris like leaves, sticks, or branches from the top of the soil. And double-check that you're not digging up an old burn pile, compost pile, or dump site.
- Use your shovel or trowel to dig a hole at least 6-8 inches deep. Make it nice and shovel-shaped.
- Excavate a 1-2 inch wide scoop of soil from one side of the hole to the other.
- Take a smaller scoop of soil from the center of your sample.
- Repeat steps 4 and 5 in different areas to gather several soil samples. Place them in your bucket.
- Mix all your soil samples thoroughly once you've gathered enough.
- Following your test kit instructions, scoop out the recommended amount of soil and follow the directions. Some tests recommend allowing the soil to air dry for a few days before putting it in your Ziploc bag.
- Don't forget to use your marking pen to label the necessary information required by your test kit.
- Take your sample to the extension office or follow the instructions on the test kit purchased from an independent lab.
- Once you receive your results, make sure to seek information on the soil amendments specific for optimal plant growth in your soil.
Testing soil pH is an important step in gardening and farming. Soil pH affects the availability of nutrients to plants and the health of beneficial microorganisms in the soil. There are several methods of testing soil pH, including using a soil pH meter, pH test strips, a soil pH testing kit, or sending soil samples to a lab. Once you know your soil pH, you can adjust it to meet the needs of your plants by adding lime or sulfur to the soil. Understanding your soil pH is essential for creating a healthy environment for your plants to grow and thrive. So, it's always a good idea to test your soil pH periodically to ensure the best results for your gardening or farming efforts..


If you’re looking for a fun and organized way to plan your garden this year, look no further than my Garden Planner Printable!

With this handy tool, you can easily map out your garden layout, keep track of your plants, and even plan out your watering and fertilizing schedule.
Plus, it's printable, so you can easily customize and update it throughout the season. Whether you're a seasoned gardener or just starting out, my Garden Planner will help you achieve the garden of your dreams. So why wait? Start planning your garden today!