Embarking on the journey of hatching chicken eggs in an incubator opens up a world of possibilities for your chicken flock. You can bring in new breeds and experience chicken egg development first hand. And if you are tired of dealing with broody hens or just want to hatch chicken eggs by yourself, I totally get it. It is an exciting process that you can involve your children in too.
The controlled environment provided by an incubator significantly increases the chances of a successful hatch. In this comprehensive blog, we'll delve into the intricacies of the incubation process, covering everything from choosing the right equipment to caring for the newborn chicks. It can be daunting thinking about hatching your own chickens, but if I can do it on my homestead, so can you!

Choosing the Right Incubator
Selecting the appropriate incubator is the first crucial step in ensuring a successful hatching experience. There are various types available, including still-air and forced-air models. Consider your specific needs, the number of eggs you plan to incubate, and the level of automation required. Investing time in choosing the right incubator sets the foundation for a seamless and rewarding incubation process.
I ended up choosing the Manna Pro incubator because of its size and automation. It rotates eggs for you and can fit up to 22 eggs. I don’t have a large chicken flock, so I don’t plan on hatching tons of eggs at once. Explore various options based on your goals.
If you plan to sell the chicks you hatch, it may be worth looking into larger incubators. I loved how simple and hands-off my incubator was, and that is exactly what I needed for my homestead!
Preparing the Incubator
Once you've chosen an incubator, the next step is cleaning. Scrub the washable parts of the incubator with warm, soapy water. You want to ensure there is no bacteria lurking in the machine as that could affect your eggs. Once cleaned and dried, move forward with proper setup and calibration.
Follow a detailed guide to configure the temperature and humidity levels within the incubator. To do this, follow the directions on your incubator. Maintaining these conditions is pivotal for the well-being and development of the embryos.
Learn the art of achieving the right balance to create an optimal environment inside the incubator, ensuring the eggs have the best chance for a successful hatch. Your incubator’s directions should walk you through the steps of how to achieve different humidity and when to do so.

Selecting Fertile Eggs
Not all eggs are created equal when it comes to incubation. To maximize the chances of a successful hatch, it's crucial to identify fertile eggs. This involves observing physical characteristics and understanding the breeding dynamics of your flock. Additionally, proper handling and storage of eggs before placing them in the incubator are essential steps to ensure the viability of the embryos.
If you have a rooster in your flock that you are able to see mate with your hens, collect the eggs they lay and incubate them as soon as possible. If you can’t incubate them right away, store them on their sides in a cool place 5C to 10C (40F to 50F.) The longer they are left, the less fertile they become, so keep that in mind with your schedule. Some sources say that they can stay fertile for up to three weeks. Do not store them in the refrigerator because that is too cold and too dry of an environment.
If you are receiving eggs in the mail or from someone else to hatch, make sure that they warm up to room temperature before placing them in the incubator.
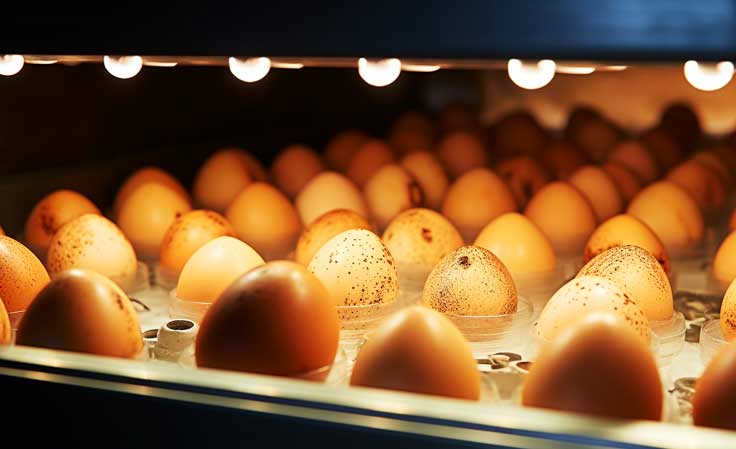
Loading Eggs Into the Incubator
Arranging eggs in the incubator requires careful consideration. Understand the best practices for positioning eggs and the importance of turning them regularly. This step ensures uniform heat distribution, promoting healthy embryo development. The proper loading of eggs is a key factor in the success of the incubation process.
Different incubators will have different ways for you to load eggs into them. I prefer an incubator that has you lay the eggs on the side and rotates for you. Laying on the side is more natural and most likely what the egg would experience in a natural environment with mother hen.
Temperature and Humidity Management
Maintaining consistent temperature and humidity levels is the heartbeat of the incubation process. Dive into the details of monitoring and adjusting these variables, and troubleshoot common issues that may arise. A stable environment is crucial for the embryos to develop properly and increase the likelihood of a successful hatch. Learn to navigate challenges and ensure optimal conditions throughout the incubation period.
If your incubator has a screen that indicates humidity levels and temperature, check on them occasionally to ensure the machine is running properly. That’s why I enjoy the more fancy machines as they will make hatching eggs a breeze.
Monitoring Egg Development
Witness the miracle of life as you track the incubation stages. Utilize candling techniques to observe the embryo's progress and identify any potential issues. This intimate involvement in the development process not only enhances the overall experience but also allows you to address any concerns promptly. Understanding the different stages of development is essential for successful hatching.
What is the candling technique? Candling, a pivotal technique in the egg incubation process, involves shining a bright light through an egg to observe its contents and assess embryo development. Typically performed around day 7 or 10 of incubation, candling is executed in a dark or dimly lit environment to enhance visibility.
Using a specialized candling device or a powerful flashlight, the egg is gently held, and the light is directed through the broader end, where the air cell is situated. The process allows for the identification of vital signs of development, including veins, blood vessels, and the embryo itself. Clear and defined networks of blood vessels signify a healthy embryo, while the absence of development may indicate potential issues.
Documenting observations for each egg aids in tracking progress, and regular candling sessions contribute to informed decision-making, ensuring the health and viability of embryos throughout the incubation period. This educational and diagnostic method adds a unique dimension to the egg incubation experience, offering an educational insight for yourself and your children into the development of an egg embryo.
I didn’t use the candling technique my first-time hatching, and my hatch still turned out great! It is up to you and if it works for your schedule.
Dealing with Challenges
Despite meticulous preparation, challenges may arise during incubation. Be equipped to address common problems such as temperature fluctuations, humidity imbalances, and potential health issues in the embryos. Proactive measures ensure a higher chance of overcoming obstacles and contribute to a positive outcome. Troubleshooting is an integral part of the incubation process.
One time I checked the incubator and the humidity had ran extremely low because it ran out of water. I mediated the problem quickly by adding the correct amount of water. My hatching wasn’t affected, but because I kept an eye on it, I was able to mediate quickly.
Preparing for Hatching
Recognizing the signs of imminent hatching is an exciting phase. Usually around 21-23 days is when the eggs will start hatching. Create a conducive environment for the chicks by ensuring a clean and warm setting. Your incubator will naturally do this for you.
This stage sets the tone for the chicks' successful transition from the egg to the outside world. By preparing adequately, you enhance the conditions for a smooth hatching process and the well-being of the newborn chicks.

Assisting with Hatching
While nature usually takes its course, there are instances where intervention becomes necessary. Learn when and how to assist chicks that are struggling to hatch without causing harm. Strike a balance between providing support and allowing the natural hatching process to unfold. This delicate process requires careful attention and knowledge to ensure the safety of the chicks.
One problem I ran into was not getting the chicks out of the incubator fast enough so when new chicks were being born, they would peck at the shell and chick trying to come out. I lost one chick due to this pecking.

Caring for Newly Hatched Chicks
The journey doesn't end with hatching; it merely transforms. Immediately attend to the needs of the newly hatched chicks—providing warmth, water, and appropriate nutrition. These early moments are crucial for their health and vitality. Understanding the immediate care requirements contributes to the overall success of the incubation process and sets the stage for the healthy development of the chicks.
You can leave the chicks in the incubator for 1-3 days as they dry off, but like I mentioned, ensure they aren’t pecking at newborn chicks who are trying to survive. The newborn chicks can live off of their yolk, and they need to dry off. After the 1-3 days, transfer them to a brooder that has supplemented heat, chick feed, water, and bedding for easy cleanup.
Cleaning and Maintaining the Incubator
Proper maintenance ensures the longevity of your incubator and the success of future hatches. Establish a routine for cleaning and disinfecting the equipment, creating a hygienic environment for incubation. Neglecting maintenance can lead to issues that might compromise the effectiveness of the incubator and, consequently, impact the success of the hatching process.
Your incubator is an investment, so treat it with care!
Common Mistakes to Avoid
In the world of egg incubation, knowledge is power. Highlighting common mistakes helps you steer clear of pitfalls that could compromise the entire process. Gain insights into potential errors, such as neglecting temperature adjustments or mishandling eggs, and fortify your approach to achieve a successful outcome.
Prevention is key to a smooth incubation experience. You will learn each season you decide to hatch eggs.
Benefits of Incubating Eggs at Home
Delve into the advantages of hatching eggs at home. From a closer connection with the hatching process to the joy of witnessing life unfold, home-based incubation offers unique benefits.
Explore personal anecdotes or success stories that inspire others to embark on their own incubation journey. The satisfaction of raising chicks from their embryonic stages to healthy, lively creatures is unparalleled.
This is a great learning experience for kids as they can learn about the development of eggs and see the early stages of life for a chicken. Hatching chicken eggs in an incubator is a deeply enriching experience that every homesteader should try at least once!
By following these comprehensive steps, you not only increase the likelihood of a successful hatch but also gain a profound understanding of the delicate process of life unfolding. The journey from selecting fertile eggs to caring for newborn chicks is a fulfilling adventure that rewards patience, knowledge, and dedication.
FAQs
How long does it take for chicken eggs to hatch in an incubator?
The incubation period for chicken eggs typically ranges from 21 to 23 days.
Can I open the incubator during the incubation process?
It's advisable to minimize opening the incubator to maintain stable conditions, but occasional checks are acceptable.
What temperature and humidity levels are ideal for egg incubation?
The recommended temperature is around 99.5°F, with humidity levels between 45% and 55%.
What should I do if an egg does not hatch?
If an egg doesn't hatch within the expected timeframe, consult resources on egg candling to assess the situation. Seek professional advice if needed.
Can I reuse the same incubator for multiple hatching cycles?
Yes, with proper cleaning and maintenance, an incubator can be reused for multiple hatching cycles, ensuring a hygienic environment for future incubations.