One of my favorite ways to store flour long term is to vacuum seal it in mason jars. Vacuum sealing flour extends the shelf life for up to a year. We are told that pre-ground flour loses its potency after just a few months, so finding ways to extend its shelf life is beneficial. Although, I have used pre-ground flour a year after its expiration date in its original packaging and it worked just fine for my baking projects. Vacuum sealing flour ensures that your flour won’t be infested with bugs and because air is taken from its storage container, it will stay fresher longer!
If you want to learn about all aspects of food storage, check out my food storage course where I take you step-by-step through food storage method and how to build your own food storage. My Prepper’s Guide To Food Storage is also full of tips, tricks, and organizational sheets to help you organize your food storage.
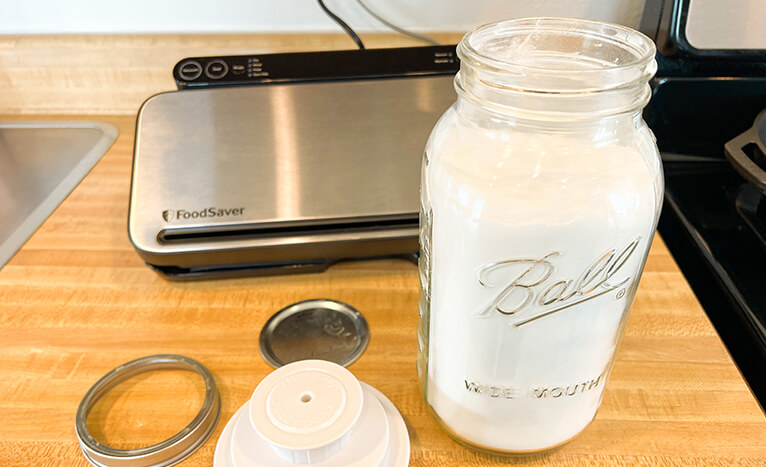
What tools do you need to vacuum seal flour?
You will need a few things to ensure that you are vacuum sealing your flour for your food storage properly. Items to get to vacuum seal dry goods:
A vacuum sealer with handheld attachment
Lid attachment accessory for regular and wide mouth jars
Mason jars and lids (wide mouth , regular mouth)
All of these tools come in handy for your food storage. Organize your pantry and organize your freezer by using these food storage tools!
Can you vacuum seal dry goods? Can you vacuum seal flour?
Yes, you can vacuum seal dry goods, especially flour! You can vacuum seal dry goods like flour, baking soda, baking powder, and a variety of spices! The easiest way to vacuum seal dry goods is in mason jars. The lids make using the dry goods easy and a use as you go situation.
I love to vacuum seal food items for my food storage because it creates extra space for me to store more food! Lovely how that works! I did an entire freezer clean-out after I got my vacuum sealer and vacuum sealed everything in it. Not only did vacuum sealing my freezer food free up space, but it also organized my freezer making it easy for me to keep track of what I had going on.
Picture of jar attachment on jar
How do you vacuum seal flour?
There are two methods for vacuum sealing flour: vacuum sealing in the jar (my favorite method) or vacuum sealing in brown paper bags. I did both of these methods in my vacuum sealing video but this blog will focus on vacuum sealing dry goods in jars. The purpose of vacuum sealing in brown paper bags would be for measuring flour ahead of time for recipes so then you can grab a vacuum sealed flour bag and already have the amount of flour ready to go. With jars, you will have to re-seal each time. Vacuum sealing jars takes no time at all, so I don’t mind doing that.
Here are the steps for vacuum sealing dry goods:
- Pour the contents into a clean jar.
- Place a lid on top of the jar (not the ring) JUST the lid
- Place the lid accessory attachment on top of the lid
- Hook the accessory port up to the lid accessory and follow the instructions on how to vacuum seal with your sealer’s accessory port. Mine, I click “hand held” and it begins the process
- Remove the lid accessory and lift the jar by the lid with your fingers to check to see if it is sealed
- To ensure a seal, twist a jar ring around the lid so the lid stays sealed. Date and name the jar.
This process does not replace canning. Canning is a special process of heating food then using the lid’s sealing mechanism to seal the jar. Vacuum sealing just removes the air.
What foods can you vacuum seal?
You can vacuum seal and store dehydrated fruits, pasta, rice, beans, spices and herbs, cereals, meat, and so much more. This will help you build your food storage by having food that is shelf stable and ready to be cooked or eaten.
Snack foods are great to vacuum seal because you can create your own snack mixes to pack for children’s snacks or if you go out hiking or on an activity. Next time you cook up Chex Mix or other snacks, make a large batch and vacuum seal for storage to have shelf stable snacks.
Dried fruits are a delicious snack that can be vacuum sealed in jars or in the plastic bags. By using the jars, you can grab and go as you please.
I love to vacuum seal all of my meat that I am storing in the freezer because it creates space and keeps my meat from getting freezer burn. In fact, I vacuum seal everything in my freezer to ensure that my food doesn’t go to waste and stays longer.
I vacuum seal fruits and vegetables that I get fresh from the store that I keep in my fridge. This is a method I use to keep fruits and vegetables fresher longer. You can read more in depth about keeping fruits and vegetables fresher longer in this blog.
What foods can be vacuum sealed?
You don’t want to vacuum seal soft cheese, raw garlic or onions, raw bananas, broccoli, cabbage, arugula, and cauliflower.
Soft cheeses become susceptible to mold if they are stored in the airless environment that vacuum sealing creates. This will make your cheeses go bad quickly, so it’s best to just store these in the fridge unrestricted from air.
Raw garlic and onions, broccoli, cabbage, arugula, and cauliflower emit gasses after they have been chopped or opened. Because of this, they can cause the bag to inflate after they have been vacuum sealed and this will make them go rancid fast. It is best to store these in an environment with airflow.
If you want to vacuum seal bananas, the best way to do this is to freeze the bananas first, then vacuum seal them and store in the freezer. These can be used for smoothies or yogurts or other baking dishes.
Truly, vacuum sealing saves you space in your food storage pantry, fridge, and freezer. It is easy to vacuum seal and the process of it keeps your foods fresher longer! No more wasting food if you have access to a vacuum sealer!